
If you are someone who uses Excel to manage the data, or your boss asks you to do that, then it is essential to understand how to lock cells in Excel.
Locking cells is an easy-to-use feature through which you can keep your chosen data safe from any unwanted editing or altering that can be done by the other users.
However, many people find it slightly tricky or confusing to lock cells in an Excel sheet, but it’s pretty easy to do. Go through this article to find the simplest ways to lock cells in your worksheet.
How To Lock Cells In Excel?
What's in this article...
Here are the steps you need to take to lock cells in your Excel sheet and keep it safe from getting tampered.
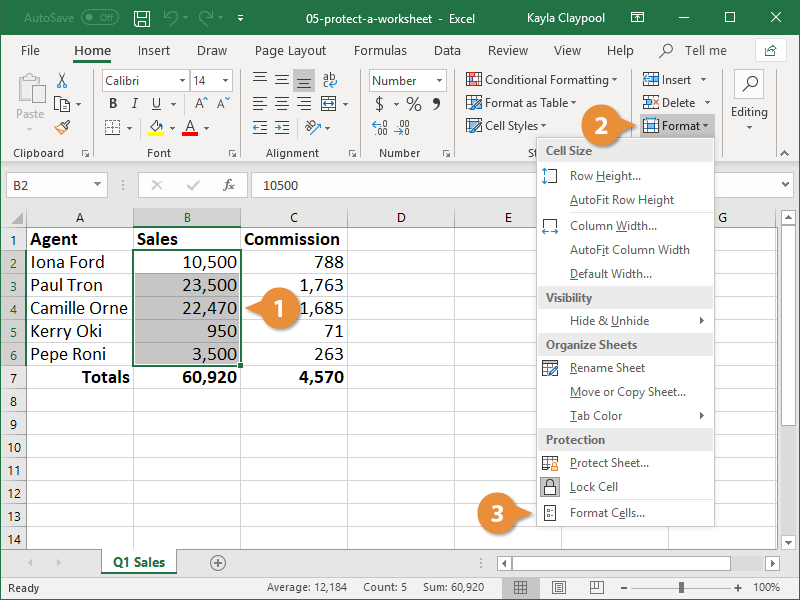
Step 1 – First, select all the cells you want to lock.
Step 2 – Navigate to the home tab.
Step 3 – You will see a Format option on the right side of the sheet. Click on it.
Step 4 – A drop-down menu will appear. Click on ‘Lock Cells.’
Please note that all cells are generally locked by default if you haven’t protected the sheet. However, keep in mind that even though all your cells are locked, there’s still a need for the password to keep it fully protected, which we will explain in the forthcoming sections.
To confirm whether all cells are locked or not, you can follow the following steps:
- Press Ctrl + A to select all the cells of your worksheet
- Right-click in the area of selected cells.
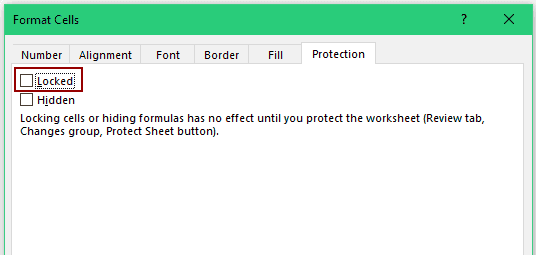
- You will get to see many options. Click on Format Cells.
- Then navigate to the protection tab.
- You can see the Locked option already checked there, indicating all cells are locked.
How To Lock Specific Cells In Excel?
There are chances that you might want to lock specific cells which are more significant than others. So, to assist you with that, here are the steps to lock your desired cells.
Unlocking All The Cells
As mentioned above, all cells are already locked in an Excel worksheet; therefore, you will
have to unlock all the cells first before trying to lock the specific cells.
Step 1 – Select all the cells in your worksheet.
Step 2 – Right-click within that selected area.
Step 3 – Click Format Cells and navigate to the Protection tab.
Step 4 – Uncheck the Locked option and click ok.
Locking The Specific Cells
Once you have unlocked all the cells, follow the steps given below to lock the specific cells.
Step 1 – Select the cells you want to lock.
Step 2 – Again, right-click within that selected area.
Step 3 – Then, a drop-down menu appears. Click on Format Cells.
Step 4 – Click on the protection tab, check the Locked options and click ok.
How To Lock Formula Cells In Excel?
Apart from knowing how to lock cells in excel, it’s also essential to know how to lock formula cells, in case, if you add calculations in your worksheet and want to keep them safe.
To lock formula cells in your Excel worksheet, firstly you will have to unlock all the cells again, then proceed with locking formula cells.
Here are the steps to follow to lock formula cells in your Excel.
Step 1 – First, unlock all the cells by following the steps we provided in the previous section.
Step 2 – Navigate to the Home Tab.
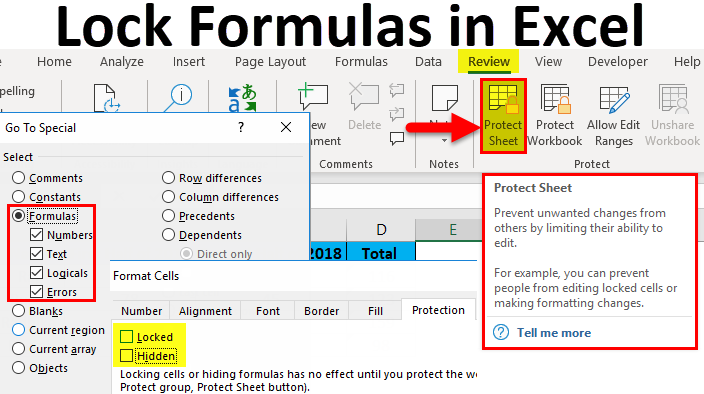
Step 3 – Click on Find & Select and select Go to Special.
Step 4 – Select Formulas and then click ok. After this, your formula cells will automatically get selected.
Step 5 – Now, again, go to the protection tab and check the Locked option.
That’s it; you have successfully locked formula cells in your worksheet.
How To Protect Your Excel Worksheet?
Once you are done locking the cells of your worksheet, it’s time to protect the sheet to make the locking of cells more effective. Follow the steps given below to protect your worksheet:

Step 1 – Navigate to the Review tab.
Step 2 – Click on Protect, which can be seen just below the review tab button.
Step 3 – Then click on Protect Sheet.
Step 4 – Select what you want to protect on your sheet by checking the boxes and then click ok.
You will also get the option to set a password for unprotecting the sheet, which is not necessary, though. But keep in mind that if you don’t set a password, anyone can unprotect the sheet.
Conclusion
Locking cells can be the best way if you don’t want anyone to alter information on your worksheet. Not only this, but you can also lock formula cells if you don’t want any of your calculations to get tampered. And that too just by following a few simple steps.
Now you can easily share your Excel sheets with anyone without worrying about any unwanted editing of your data – thanks to Excel for providing such features.
So, that was all about how to lock cells in Excel? We hope this article was helpful to you.
Ansh Sharma is a content writer who possesses the skill of describing different topics in a simple and creative manner. He has a vast interest in crypto and finances, but is also well-versed with many other niches like pets, health, technology, gaming, etc. Apart from writing, he loves to read non-fiction books to continually learn and grow.