
Adventures In Computer Maintenance – How To Clean Your Laptop Computer
What's in this article...
Step-by-step guide on how to clean your laptop computer to keep your machine working in tip-top condition. For best results, read through all of the steps before beginning.
This past weekend I noticed that the fan in my laptop was running a lot. In fact, the computer shut itself off while I was working because it was too hot.
I decided that I should probably get all the dust and cat hair cleaned out of it before the thing died altogether.
So this morning I tackled it. How hard could it be? I mean, I used to open up my desktop computers all the time.
This is what I learned about cleaning a laptop computer…

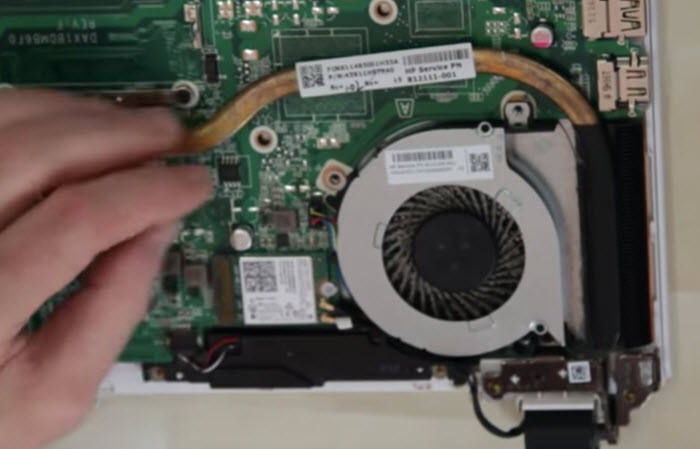
Step 1: Remove Screws
Before you can clean your laptop computer, you have to get inside
a.) Turn the laptop computer over and remove the screws. This is easy enough, even though there are about 327 screws. They will be different lengths, so you might want to separate them in empty egg carton compartments and label them so you remember where they came from.
b.) Run a magnet across the carpet surrounding your work area to locate all the screws after you accidentally knock the egg carton off the table.
c.) Gently separate the bottom of the laptop from the top. Note the spots that aren’t coming loose and search for the screws you missed. This will take, more or less, fifteen minutes, and you won’t find any more screws.
d.) Remove all components from the laptop to find the screws hidden inside the compartments and remove them.
e.) Again gently try to separate the parts of the laptop like the battery. Walk away to cool down after discovering that something is still holding the pieces together.
[adrotate group=”2″]
Step 2: Find Screws You Can’t Get To
They don’t make cleaning your laptop easy!
a.) Locate screws under the hinged side of the monitor where you can’t get to them. Spend about ten minutes looking over the entire laptop to convince yourself there really aren’t any other screws.
b.) Very carefully pry up the plastic pop-in panel adjacent to the monitor.
c.) Remove the screws from the monitor hinges and then the previously inaccessible screws. Of course, the monitor is still attached to the laptop by wires that run under the keyboard.
d.) Once again try to separate the two halves of the laptop shell, finding that it still doesn’t come apart. This might be a good time for a glass of wine.

Step 3. Remove Keyboard
a.) Remove the screws that hold the keyboard in place and slowly lift the keyboard out. It is attached with a connector that you can easily disengage, believe it or not.
b.) Realize that you still can’t disconnect the monitor, so you’ll have to work with it hanging precariously by its wires.
c.) Set the keyboard aside, being careful not to pop off any keys. They’re a real bugger to put back on. Ask me how I know.
d.) Under the keyboard find a simple panel attached by only one or two screws.
e.)Realize this panel is where you access the fan and you didn’t have to remove all those screws to separate the bottom of the laptop at all.
f.) Forget the wine. Get out that bottle of Patron.

Step 4: Remove The Panel And Unscrew The Fan
Now we’re getting somewhere…
a.) Remove the panel under the keyboard. Remove the screws holding the fan in place. Make sure you clean a noisy laptop fan while you can.
b.) When you drop the tiny screws into the body of the laptop where no fingers will reach, consider that you can no longer turn the unit upside down to shake it out because your monitor is hanging by fragile wires.
c.) Attempt to tease the screws out with the smallest screwdriver you have, succeeding only in pushing them further into the crevices.
[adrotate group=”2″]
Step 5: Reassemble
a.) Now it’s time to put it all back together. Here’s where you curse yourself for not taking digital pictures of each step when you took it apart.
b.) If you’re lucky, you’ll have a screw for every hole, and none left over. If you come up short of screws, just make sure all four corners of the laptop case are secured and call it good.
c.) See if there’s any Patron left in the bottle and relax for the rest of the day. You deserve it.
Step 6: Disregard Steps 1 Through 6
The best way to clean your laptop computer…
Just take the dang thing to the computer store and let them hassle with it!
If you’ve ever taken apart a laptop computer, you know why they charge what they do.
Next time, I’ll take mine to the pros!