
Do you want to boost the performance of your PC? A smart way to make your PC work faster — overclock a CPU. It is achieved by launching your CPU at a higher frequency.
Overclocking will offer you more processing power by forcing your computer’s CPU past its intentional speed.
What is meant by overclock CPU?
What's in this article...
Overclocking is a procedure that pushes the CPU to operate at a higher speed than its maximum limit. It’s a way to squeeze more power from your CPU without allowing any physical changes to your pc.
When you overclock, you override the Processor’s default configuration and set it to run at speed faster than the actual limit set by its manufacturing company. It may sound troublesome, but it is advisable to over time your CPU securely and without any prolonged negative impacts.
What does overclocking do to a CPU
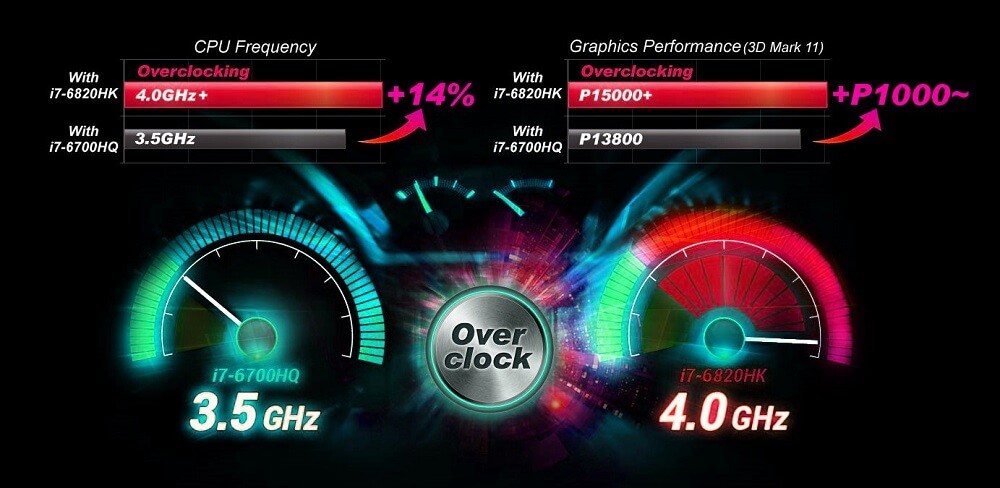
You are overclocking works by increasing your CPU clock rate. The clock rate is a measure of the speed of the Processor. The higher the clock rate, the higher the amount of work the Processor can control. The clock speed is measure in GHz.
When you overclock the CPU and increase its clock rate, you increase its performance and enable it to execute tasks at a higher frequency than before. The same explanation also applies to your GPU. Overclocking your GPU is a ideal way to improve your gameplay experience.
lets move to the step-by-step guide to overclock CPU
Steps to overclock a CPU

Ready to get started, huh? We’re here to assist you in each step of the procedure. Follow our step-by-step guide to find out how to overclock the CPU securely.
First: Getting Prepared
1. Understand the fundamentals of overclocking CPU
- Overclock CPU will harm your hardware, mainly if the equipment is not ready for it or if you raise the voltages too far. You’re only supposed to overclock if you’re OK with the potential of damaging your hardware.
- No two devices would overclock the same even they have similar hardware configurations. That’s because overclocking is significantly affected by small variations in manufacturing. Don’t base your hopes entirely on the results you’ve read online with your equipment.
- If you’re looking solely to improve video game efficiency, you may want to try overclocking your graphics card instead, as you’re likely to get better results.
- Laptops are not great choices for overclocking because their cooling capacities are minimal. You’ll get a lot greater efficiency gain on a desktop machine where you can monitor temperatures better, and you’ll never end up overheating your laptop or burning your Processor if you attempt.
2. Installing the necessary tools
You will need a few performance analysis and stress test tools to test the overclocking output better. These applications measure the efficiency of the Processor as well as the ability to sustain its overall performance.
- CPU-Z-This is a primary display application that quickly shows the clock speed and power in Windows. It does not act, but it is an easy-to-use interface to ensure that everything is functioning correctly.
- Prime95-This is free benchmarking software that is commonly used for stress checks. It’s ready to work for long periods.
- LinX-Another performance test software. This one is simpler than Prime95, which is useful for checking between each update.
3. Checking the motherboard and Processors
When it comes to overclocking, various motherboards and chips will have different characteristics. There are some minor variations in overclocking AMD vs. Intel, but the necessary procedure is the same. If the multiplier is disabled, you will only change the clock speed, which typically shows inconsistent performance.
Second: Increasing the base clock rate
1. Opening BIOS
You will make several improvements to your computer’s BIOS, which is the setup menu that can be viewed before your OS is enabled. You can reach most of the BIOS by keeping the Del key while the device is booting. Other possible initialization keys are F10, F2, and F12.
2. Open the “Frequency Control” button.
This menu can be classified differently, such as “Overclocking” This is the section that you spend much of your time in, as it will allow you to change both the Processor speed and the voltage it gets.
3. It is only Increasing the base clock by 10%.
Increase your base clock by ten percent. Typically, it is a lower frequency than increases to reach the maximum core speed. Most processors can make a quick 10 percent jump at the beginning of the process.
4. Take a stress test
Once you have completed your initial 10% increase, reboot your pc and boot to the os. Start your LinX and operate it through a couple of cycles. If there’s no issue, you’re prepared to move over. If your PC is unstable, you may not even be able to get a lot of overclocking effectiveness, and you should reconfigure your configurations to default.
Third: Increasing your multiplier
1. Render the base clock lower.
You’ll want to lower the base clock a little before you begin raising your multiplier. It will help make it more accurate to increase the multiplier. Using a lower base clock with a high multiplier will result in a more reliable device, but more efficiency will come from a higher base clock and a lower multiplier.
2. Elevate the multiplier.
Raise your multiplier in 0.5 intervals until you’ve lowered your base clock a little. The “CPU Ratio” or anything similar might be called the multiplier. When you first experience it, you will set it to ‘Auto’ instead of a number.
3. Begin the stress test.
Restart your pc and run your software for benchmarking. If the machine does not find any bugs after a few runs across the benchmark, you are successful at raising the multiplier again. Repeat this step if the multiplier presents another increment.
4. Keep an eye on the temperature.
During this procedure, make sure you pay careful attention to your average temperature. Before your machine becomes dysfunctional, you could reach a temperature cap. You could have reached the maximum limits of your overclocking potential if this is the case. You can find the best compromise between continuing to increase the base clock and increasing the multiplier at this stage.
5. Repeat before you hit the cap, and the machine crashes.
Now you should have configurations that only slightly make the system unreliable. It would be best if you began changing the output voltage to allow further changes, as long as your temperature is still within acceptable limits.
Fourth: Increasing Voltage
1. Increase the central voltage of the CPU.
It is also known as “Vcore Voltage” Rising your voltage above acceptable limits will quickly destroy your devices, making it the finest and possibly most challenging aspect of the overclocking process. Each Processor and motherboard can withstand various voltage rises, so pay extra close attention to your temperature.
Increase the core voltage by 0.025 amounts. You face the risk of going too far and harming the parts.
2. Start the stress test.
After the first rise, take a stress test. Since you left your system in a dysfunctional state in the previous segment, you’re hoping for a safe stress test run. If the machine is secure, make sure the temperatures are still at an appropriate amount. If the device is still unreliable, try lowering either the multiplier or the simple clock speed.
3. Return either to the base clock or to the multiplier section
Once you’ve started to complete your unbalanced system stable by increasing the voltage, you can go back to raising either the base clock or the multiplier, based on which you’re trying to overclock. Raise them in the same smaller amounts, run stress tests till your system becomes unbalanced again.
4. Continue the process until the maximum voltage is attained.
Eventually, you’re going to reach a point where you can’t get any more changes, or the temperature is approaching dangerous thresholds. It is the threshold of your motherboard and chip, and you are likely not to be able to advance past that stage.
Fifth: Final Stress Testing
1. Back it down to the most recent safe settings.
Reduce the base clock down to the very last working settings. It is your new chipset speed, and if you’re lucky, it’s going to be noticeably faster than before. As long as everything starts OK, you’re ready to begin the final test.
2. Increase the speed of your memory.
Increase the speed of your memory back to its initial stage. Do this steadily. Test your stress when you go. You may not be able to get them back to their original setting.
3. Run an extended stress test.
Launch the Prime95 and take the test for 12 hours. It may seem like a lengthy moment, but your purpose is to keep rock-solid stability over a prolonged time. It will lead to improved and more consistent performance. If your PC becomes unbalanced during this test or your temperatures reach dangerous levels, you will need to go back and adjust your clock frequency, multiplier, and power output.
Is Overclock CPU safe?

Overclocking is secure if carried out cautiously and accurately. It would help if you eased the CPU into higher speeds by steadily increasing the clock rate and then testing each time to ensure it is running normally. Slowly go: persistence is the secret to a safe and effective overclocking.