
Did you ever wonder, like “How to make chrome extension?” No matter how many Chrome extensions we already have, we never get enough of them just because they ease our lives like anything.
Endless chrome extension options are available. We now enjoy wonderful browsing experience with Chrome, all thanks to its grand library of extensions. If you’re new to this term – “Google Chrome Extensions,” let us introduce it to you:
What are Chrome Extensions?
What's in this article...
Chrome extensions are the small software programs that personalize the browsing experience for Google Chrome users. Anything that you browse using Chrome can be customized according to your needs & preferences.
Chrome extension development is done using HTML, JavaScript & CSS.
A chrome extension fulfills one purpose at a time. For instance, the Color Picker extension will identify the hex-codes of any colors visible during browsing. However, a single extension can offer multiple functionalities.
How to make Extensions for Chrome?
This blog is a complete guide on writing extensions for chrome & getting it ready to use in no less than 20 minutes. Even if you’re a beginner, you can sail the sea smoothly.
Before we begin, we recommend you have a quick overview of Chrome Extensions.
We’ll now proceed to the steps that will help you out in creating & launching a chrome extension successfully.
Chrome Extension Tutorial
3 Steps to Create & Publish Chrome Extension
- Define File Structure
Firstly, we need a well-defined file structure. Chrome extension requires four essential file elements to be defined & here they are:
a. manifest.json file
Manifest.json is the key file to create a chrome extension. It is the configuration file that defines how the browser will load several resources & permissions to run the attachment. This file also consists of the necessary information, i.e., the extension name, maker of the extension & its description. All this is visible as soon as the extension loads.
Let’s create a sample page. Make sure you enter the following lines of code into manifest.json file:
{

    "name": "Hello Extensions",

    "author": "Your Name Here",

    "description" : "Base Level Extension",

    "version": "1.0",

    "manifest_version": 2

    "web_accessible_resources": [

    "resources/**"

],

“content_scripts”: [{

“js”: [“jquery.js”],

“css”:[“style.css”],

“matches”:[“domain-name/*”]

}]

"browser_action": {

      "default_popup": "hello.html",

      "default_icon": "hello_extensions.png"

    }

  }
Next, you’ll have to create an HTML file with the following code and name it as hello.html:
<html>

    <body>

      <h1>Hello Extensions</h1>

    </body>

  </html>
b. Chrome Extension Icon
Firstly, add an icon to your chrome extension. Download Hello Extensions PNG here.
As seen in the LOC above, the default_icon contains hello_extensions.png
This property is responsible for displaying the extension icon whenever it is active in the browser.
Add icon to display an icon when the user accesses the extension from the Chrome Extensions page & imports the plugin & it can be defined as follows:
“icons,”: “imagename.png.”
c. Chrome Extension Content Scripts
Once you add the icon, you now have to define the styles, scripts & constraints under which the extension will load. Call manifest.json code under styles.css or jquery.js, respectively.
In our example, we’ve defined them merely as: “content_scripts.”
The script will start loading as soon as the condition matches.
d. Resources that you want to make accessible
To load any other resources like images, audio, or video files, you have to specify in your manifest.json file that you may load such files later. You’ll have to tell your manifest.json file using the piece of code as “web_accessible_resources” in our example.
By doing this, you create the code. You now have to include it in the browser to load, run & check how it works. Let’s proceed to step -2.
- Load the Extension
- Go to chrome://extensions -> Extension Manager
- Turn the “Developer Mode” ON
- Look at the top-left screen corner & click the Load Unpacked button. Now select the extension’s folder.
- Click on the toggle button of your extension card & activate your extension.
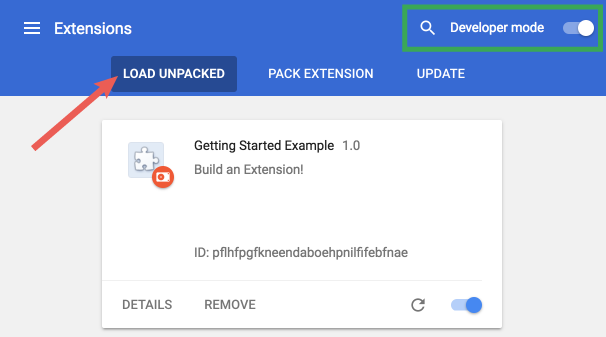
- Debug the Loaded Extension
It is important to reload the extension any time you make changes in the manifest.json file. As the LOC changes, you’ll have to reload the file so that the resources are updated & loaded again.
To debug the extension, you’ll only have to click on the round arrow visible in the bottom-right corner & you’re all set.
As you run this code, the extension will run the Hello.html file & display “Hello Extensions.”
How to download Chrome Extension?
Downloading chrome extensions is straightforward & it can be done in minutes. The extension files are zipped as .crx package that is downloaded & installed by users. This makes them content-independent, unlike other web apps.
Create & publish Chrome Extensions with this simple chrome extension builder tutorial. You can make extensions in no time as you get used to the logic. Once you understand the reason & are successful in running the code, you can then make your extensions in no time.