

Even though you have reached the technically advanced decade yet, there are still some computer errors that you cannot forget. For example, in the 1900s as well, screen tearing in Windows PCs was common. Today, computer systems have advanced sufficiently to handle high-end 3D Gaming, video editing, photoshop, graphics creation, and whatnot. But, sometimes, best of best laptops with the finest graphics cards internally or externally installed face screen tearing issues. Why is that?
Well! In the event that you are looking for answers concerning screen tearing issues on your Windows PC or macOS, you have clicked on the right tab at the right time. Today, we brought you a brief guide on screen tearing. Why does it happen? And, how can you fix it? Let’s get started:
Screen Tearing – Introduction to the issue of the day!
What's in this article...
To begin with, by definition, Screen Tearing is indeed a visual artifact in the context of photographic display. For the most part, technically, screen tearing happens because the display device (i.e.., PC’s monitor) showcases information from more than one frame in a solo screen draw. Meaning, at the time of screen tearing, your display’s refresh rate loses synchronization with the video feed on your monitor. In simple words, when you refresh your display (or, it automatically refreshes), the video feed on your monitor gets stuck. As a result, it crafts multiple tears on the video feed on the monitor.

For example, let’s suppose that your average Windows PC runs at a 60Hz display refresh rate. It simply means that your display refreshes 60 times every second. In comparison, Windows PC average video feed refresh rate is 24 frames per second. As a result, with 60Hz and 24 frames per second, your screen will remain intact because of common synchronization.
However, in a scenario where the refresh rate of the display increases from 60 to 75. As a result, the computer system will require a graphic card to improvise the video feed rate as well. However, if your graphics card is not capable enough of doing that, it will not create synchronization of the video feed with the latest display refresh rate. As a final result, the screen will begin to tear.
It is one of the reasons why highly advanced computer systems require highly advanced graphics cards for a 100% synchronized screen.
Why does the problem happen?
As mentioned before, one of the mainstream reasons why screen tearing happens is that the sync between display fresh rate and video feed frame rate has been disturbed. But, the main question stands, what are the situations that cause this disturbance?
To begin with, it is essential to note that GPU/CPU remains responsible for originating frames when you are using your PC to run high-end graphic functions like video editing, web streaming, photoshop, or Gaming. Now, in the event that your monitor’s tech quality does not allow it to handle such a high capacity of frames in one go, the disturbance will occur. As a result, the screen begins to tear.

More often than not, Windows PC users also load their PCs with heavily improvised graphics cards for gaming purposes. However, if the computer is not that advanced, it will not be able to handle such improvisation. As a result, screen tearing problems will occur over and over again.
In comparison, for some users, the situation can also be reversed. For example, let’s suppose your Windows PC is made to handle the highest frame rate. Thus, there’s no reason for you to stop playing heavily loaded AAA games. But, in the event that your graphics card is not advanced enough, it will not generate frames according to the requirements of the game. As a result, the screen will tear.
Thankfully, our tech experts have come up with multiple solutions for screen tearing issues in PCs. let’s take a glance:
Top Five Methods to Fix Screen Tearing Issue in PC(s)
Before we go ahead, it is essential to note that all the methods mentioned below solely focus on balancing the display rate to the frame rate, both directly or indirectly. Thus, before applying any of the following methods, please ensure that your monitor is advanced enough to handle your GPU’s HFS and vice versa.
Disclaimer: All the methods mentioned below are 100% true and tried. In the event that one method does not work out for you, please skip to the next. During the procedure, if your PC begins to overheat, please shut it down instantly to prevent GPU from any type of permanent damage.
#Method 1: Adjust the G-Sync feature on your Control Panel
You may be wondering what GSync is? Well! In the event that your computer system has NVIDIA’s GPU installed, you will view a “GSync” option in your monitor settings. According to the latest update, GSync is a feature newly introduced in NVIDIA manufactured GPUs specifically to protect screen tearing issues. For the most part, the G-Sync feature ensures that your display rate is always in sync with the frame rate.
For the most part, it is possible that G-Sync disabled/enabled on your PC is causing the problem. Thus, the best solution is to enable it if it is disabled on your PC and vice versa.

Here’s a brief order guide on how to do it:
- First of all, access the control panel.
- In the event that your PC has an NVIDIA graphics card, you will see the “NVIDIA control panel” option when you right-click on the desktop screen after refreshing it.
- Now, on the right margin of the screen, scroll down to the “Set up G-sync” alternative.
- Tap on it. Next, tick the box behind the “Enable G-sync” option.
- For more clarity and smooth sync during the game, tick the box behind the “Enable for full-screen mode” alternative.
- Finally, click on the Apply control on the bottom to confirm settings.
- Go back.
- It is time to restart your PC and see the results.
Please note that if the G-Sync was already enabled when the screen tearing problem was occurring, we propose that you disable it and restart your PC.
If no change happens while enabling or disabling G-Sync, it means that something else is causing the problem. In that case, shoot through the next method.
#Method 2: Update graphics driver on your PC
From time to time, driver updates will show up in the Windows PC software update app on your PC. However, more than 40% of computer users avoid upgrading software or drivers, for that matter, until necessary. Well! Screen tearing is an issue when ensuring that your graphics card is up to date is crucial. Here’s how to do it:
- First of all, access the device manager on your PC.
- Please ensure that no other app is running in the background and your internet connection is steady.
- Access the Start menu and type “device manager.” tap on the program under the Best match section.
- Now, scroll down to the “Display adapters” option in the device manager main menu.
- Under it, select the graphics driver that you want to update. For example, NVIDIA GeForce.
- Right-click on the “graphics driver (type)” you want to update.
- Click on the “Update Driver” alternative.
- Wait for the procedure to complete.
- Restart your PC to verify results.

In the event that your PC says “no new update available” for the graphics driver, you can simply uninstall it. And further, reinstall it. It will allow you to reset the graphic drivers on your PC and deliver a fresh start.
#Method 3: Reset your Power Plan to the Highest performance level
This method is specifically recommended for users who play graphically advanced games on Laptop. To avoid screen tearing disturbance during your game, you can adjust your computer’s power plan. It will allow your PC to focus its power capacity on the game. Here’s a guide for your reference:
- Access the run administrator option on your PC. (Shortcut apply: Windows Key + R Key).
- Here, in the Type box, enter “Powercfg.cpl” and click the enter button.
- The power plan menu will appear on the screen.
- Further ahead, scroll down to “Show additional options,” and click on it.
- Here, do you see a “high performance” option? If yes, click on the empty circle behind it.
- Save the setting and go back.
- Restart your PC and verify results.
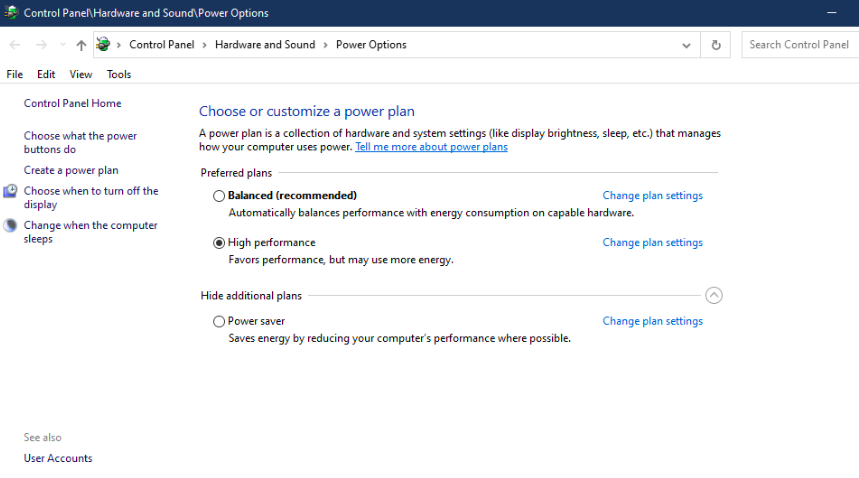
Please note that when you enable a high-performance feature in the power plan, you will observe quick battery drainage as compared to before. To protect it at some level, adjust screen brightness.
#Method 4: Disable the “XBOX Game Bar” feature if you are not a gamer
When it comes to Windows PCs, they are highly advancing on the lines of games. Recently, Windows has launched a new feature called “XBOX Game Bar.” This feature has specifically launched for gamers to easily stream their Xbox game on live channels. However, it also acts as a disadvantage for PC users who are not interested in Gaming. Thus, to protect the XBOX game bar from exercising in the background and generate a high frame rate per second, it is best to disable it. Since it is an in-built feature, uninstalling is not an option.
Here’s a guide for your reference:
- Go to Windows Settings (exercise shortcut: Windows Key + I key).
- Now, tap on the “Gaming” alternative.
- Next, click on the “XBOX Game Bar” alternative.
- Use the toggle slide to turn it off.
- Save the settings and go back.
- Restart the PC to view the results.
#Method 5: Screen Tearing? Disable Frame Limiting Option
Like the Xbox game bar, Windows has many new features relating to games. One feature goes by the name “Frame limiting.” This feature is specifically in Windows PC to ensure that the GPU creates the highest frame rate possible per second. Thus, if this alternative is enabled on your PC and you are not Gaming, it means that your GPU is creating frames per second which are not manageable by your display’s refresh rate capacity. Thus, causing screen tearing issues. Here’s an instructional guide to resolve it:
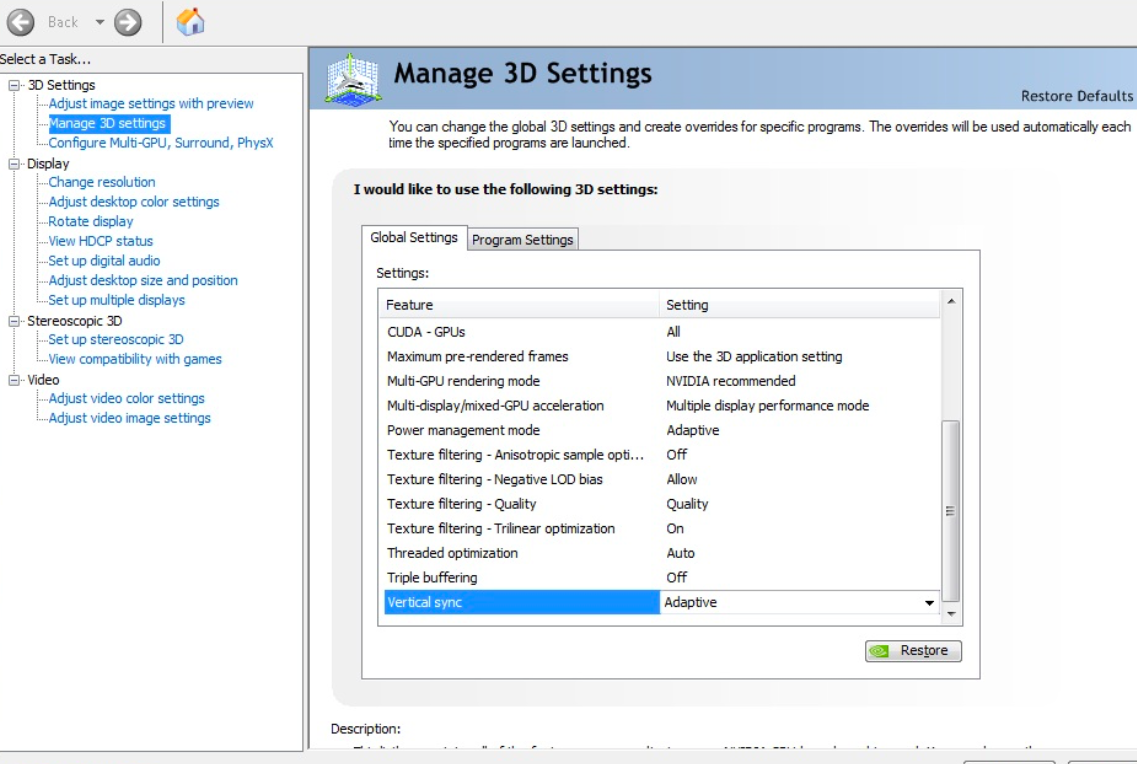
- Go to the Vsync option on your PC.
- Disable it.
To do so:
- Access the “Start Menu.” Or, exercise the “Windows Key” shortcut.
- Here, type “NVIDIA Control Panel” and click on the program under best match.
- Further, click on the “Manage 3D Settings” option.
- From then and there, slide down to the “Vertical Sync or Vsync” alternative.
- Click on Vsync and observe the option to “Force ON/OFF” it.
- Click on “Force OFF” to temporarily turn it off.
Epilogue
Is your screen tearing problem resolved? Thanks to our experts, we provide the best true and tried solutions for uncommon computer issues. For more information on the subject, keep us in your favorites. Drop queries to get real-time solutions. Thank you!